Introduction:
In the vast digital landscape of technology, there exists a tiny wonder that has captured the hearts and minds of students worldwide—the micro:bit. This unassuming microcontroller, no larger than a credit card, packs a punch when it comes to igniting curiosity, creativity, and coding skills. One of the key strengths of the micro:bit is its beginner-friendly programming interface. Users can program the micro:bit using a variety of programming languages, including Microsoft MakeCode, MicroPython, and Scratch. These languages offer different levels of complexity, making the micro:bit accessible to users with varying levels of programming experience.

Let’s delve into the mysterious world of the micro:bit and explore why students adore it.
What is a micro:bit
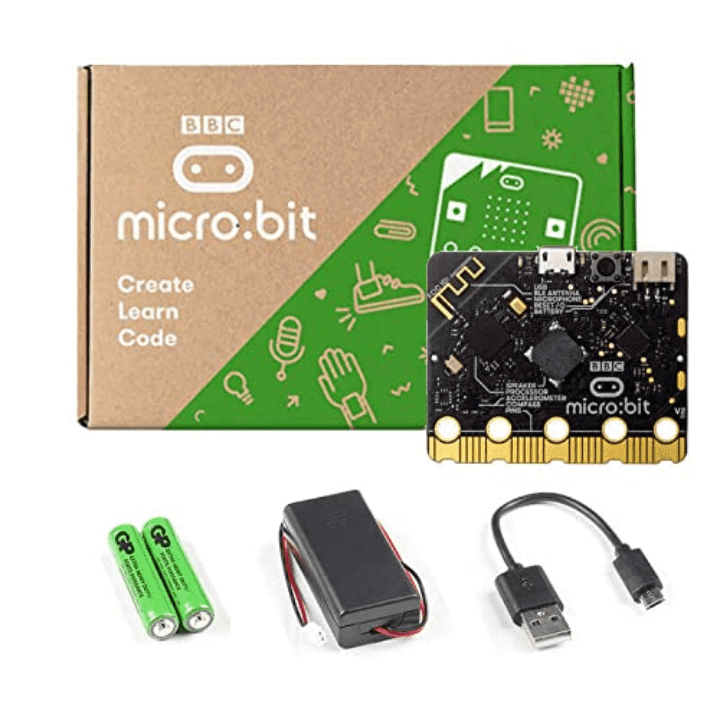
The micro:bit is a pocket-sized computer that introduces kids to how software and hardware work together. It is an interactive and programmable device, which consists of various input-output features such as LED light display, sensors, buttons, was originally created by BBC. It has gained popularity worldwide for its simplicity, versatility, and educational value.
Specifications:
- Nordic nRF51822 – 16 MHz 32-bit ARM Cortex-MO microcontroller. Memory Unit
- 256 KB Flash Memory and 16 KB static RAM> General Purpose Input/Output
- 2.4 GHz Bluetooth low energy wireless networking.
- OTG USB 2.0 controller, used as a communication interface between USB and main Nordic Microcontroller.
- 3 Axis Accelerometer Sensor.
- 3 Axis Magnetometer Sensor.
- MicroUSB connector, battery connector, 25-pin edge connector.
- Display 25 LEDs in a 5×5 array.
- Three tactile pushbuttons. (two for applications and one for reset)
- I/O also includes three-ring connectors, which accept crocodile clips or 4 mm banana plugs as well as a 25-pin edge connector with two or three PWM outputs.
Getting started with micro:bit:
Power up your micro:bit
Simply add 2 x AAA batteries to the battery pack, and connect it to your micro:bit. Your micro:bit will automatically turn on.
Note: you can also power your micro:bit by connecting the USB cable to a computer, without using the battery pack.

Welcome to your micro:bit
All new micro:bits are distributed with a ‘meet the micro:bit’ program to help you explore key features. When it turns on, the LED display output will spring into life and, in most cases, will greet you with a heart.
Tip: Turning off your micro:bit Hold the reset button until the light goes out (about 4 seconds) to power off your micro:bit. Power off at the end of each use to conserve batteries (or unplug the battery pack)

Experiments that can be performed on a micro:bit
- Name Badge: You can program the micro:bit to display your name in scrolling text by utilizing the LED matrix. You'll need to create a loop that scrolls the text across the screen continuously. Here's a simplified example in MakeCode:
basic.showString("Your Name", 75)
- Emotion Badge: You can use buttons as inputs to change the display on the micro:bit. For example, you could program it to display a smiley face when Button A is pressed and a sad face when Button B is pressed. Here's a simple example:
input.onButtonPressed(Button.A, function () {

basic.showIcon(IconNames.Happy)

})

input.onButtonPressed(Button.B, function () {

basic.showIcon(IconNames.Sad)

})
let steps = 0

basic.forever(function () {

if (input.acceleration(Dimension.X) > 500 || input.acceleration(Dimension.Y) > 500 || input.acceleration(Dimension.Z) > 500) {

steps += 1

basic.showNumber(steps)

basic.pause(500)

}

})
- Nightlight: Use the light sensor to detect ambient light levels and turn on an LED when it gets dark. You'll need to program the micro:bit to continuously check the light level and turn on the LED when it falls below a certain threshold. Here's a simple example
basic.forever(function () {

if (input.lightLevel() < 50) {

pins.digitalWritePin(DigitalPin.P0, 1)

} else {

pins.digitalWritePin(DigitalPin.P0, 0)

}

}):
- Rock, Paper, Scissors Game: Combine inputs from buttons with randomization to create a rock-paper-scissors game. Here's a basic example:
input.onButtonPressed(Button.A, function () {

let opponentChoice = Math.randomRange(1, 3)

if (opponentChoice == 1) {

basic.showString("Rock")

} else if (opponentChoice == 2) {

basic.showString("Paper")

} else {

basic.showString("Scissors")

}

})
}
})
These are just starting points for each project. You can customize and expand upon them based on your preferences and programming skills using the MakeCode platform or other programming environments compatible with the micro:bit.
Few reasons why a micro:bit is fantastic for beginners:
- Affordability: The micro:bit is budget-friendly, retailing for around £12.99 or slightly more in a kit with a USB cable and battery pack. This accessibility makes it less of a financial risk for families to explore coding and electronics.
- 25-Pixel LED Screen: While it may seem limited with only 25 pixels, this screen encourages creativity beyond graphics. Beginners can focus on creating simple designs, like their best alien, using a 5x5 grid and a single color.
- Text Display: The micro:bit’s ability to display text is invaluable for conveying information effectively.
- Built-In Inputs and Sensors: Without the need for additional components, beginners can experiment with various inputs and sensors. No more confusion about which components to buy or complex wiring diagrams.
- MakeCode Graphical Editor: The free MakeCode editor runs in a web browser and is beginner-friendly. It even guides users on how to connect components referenced in their code.
- Easy Connections with Crocodile Clips: While kids might find them a bit fiddly, crocodile clips simplify connecting electronics. They’re easier to handle than jumper leads on a breadboard.
- Headphone and Buzzer/Speaker Connectivity: The micro:bit allows you to connect regular headphones, demystifying everyday tech. Plus, it’s safer than soldering for young learners.
- Versatile Projects: The micro:bit supports a wide range of projects, from simple games to interactive art and wearable tech.
- Coding Skills: It encourages basic coding and programming skills, preparing students for today’s tech-savvy world.
Conclusion :
The micro:bit, a miniature marvel in the world of technology, has captivated the imagination of students worldwide. What sets the micro:bit apart is its user-friendly programming interface, accommodating beginners and seasoned enthusiasts alike with languages like Microsoft MakeCode, MicroPython, and Scratch. With features including LED displays, sensors, and buttons, the micro:bit serves as a versatile platform for a myriad of projects and experiments.
The micro:bit offers endless possibilities for exploration and innovation. Its affordability and accessibility further democratize learning, making coding and electronics more approachable to aspiring technologists. As students engage with the micro:bit, they not only hone their coding skills but also cultivate problem-solving abilities essential for navigating the digital landscape of the future.