Introduction
The PIR or Passive InfraRed sensor is one of the most used motion detectors.
It detects infrared radiation generated by objects or live animals inside its range of vision, which varies in temperature from warm to cold.
This change is recognized when an item travels across this field, triggering the sensor's alert.
The fundamental operation is to measure the temperature differences between two spots on a passive IR element and then trigger an output signal based on these readings.
Generally, once triggered, PIRs will send out pulses for up to several minutes until no more movement has been sensed in their view area before resetting back into standby mode again where they wait quietly for further activity signals.
With its ease of use and long-range coverage capabilities as well as relatively low cost make it an ideal choice in applications such as home security systems commercial intrusion prevention solutions retail store anti-shoplifting initiatives automated lighting control etc.

PIR sensors are used in a wide variety of applications such as lighting control, smart home, and IoT applications, Automatic door opening system, Security alarms, and Human detection robots in search and rescue operations in disasters, multifunction printers, etc.
So let's understand what is a PIR sensor and how it works so we can use it in our projects.
What is a PIR Sensor?
Passive infrared sensor is a small low-priced Passive infrared motion detector sensor.
As the name suggests it doesn’t emit radiation (unlike an Infrared (IR) sensor which emits infrared radiation) but it detects the changes in infrared radiation of the source. It's very facile to use and hence used in diverse applications.

PIR Sensor Working Principle
It works on the principle that whenever it detects a change in infrared radiation, it generates a digital output signal.

PIR sensor consists of a fresnel lens, pyroelectric material (metal can and a rectangular crystal).
A Fresnel lens which is made of high-density polythene concentrates the incoming infrared radiations so that they fall on the pyroelectric material.
Metal can help to make the sensor more immune to temperature, humidity, and noise. Pyroelectric material detects the changes in infrared radiation and generates an output signal.

It is made up of 2 slots of special material sensitive to IR. When a person comes in the range of the sensor, the first slot creates a positive differential voltage and when the person leaves the second slot creates a negative differential voltage. These changes are detected.

This output signal is further processed by the external circuitry and converted to digital output.
Read our blog explaining the IR sensor working where we explained the types of IR Sensors, how an IR sensor works with example, and applications of IR Sensors.
What does a PIR sensor detect?
Passive infrared sensors can detect human or animal motion. Humans emit infrared radiation.
When a human comes into the sensing range of the sensor, these changes in radiation are detected by the sensor which causes the output of the sensor to go high.

PIR Sensor Range
Passive infrared sensors are available in a wide range of options:
Indoor curtain-type PIR sensor: Range is between 25 cm to 20 m
Indoor passive infrared: The range is between 25 cm to 20 m
Outdoor passive infrared: The range is between 10 m to 150 m,
Outdoor passive infrared curtain detector: Range is between 10 m to 150 m.
Considerations For Installing a PIR:
Here are some key considerations while installing a PIR (Passive Infrared) sensor easily and effectively:
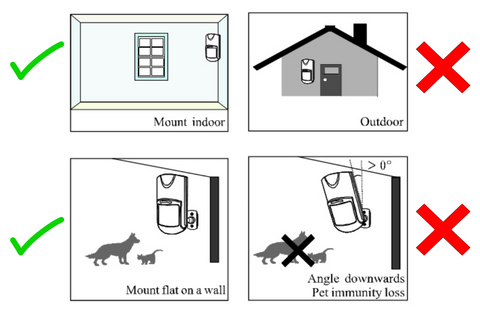
- Know your sensor's range and detecting capabilities. This allows you to determine where to position it for the greatest results.
- Locate a position on the ceiling or wall that provides a clear view of the area you wish to monitor. You may place it near the lights to automate them.
- Install the sensor using screws and adjustable brackets. Position it to watch the entrances and hallways.
- Avoid hot places and sunshine. They issue terrible notifications. Move the sensor away from heaters, air vents, and direct sunlight.
- Position the sensor 2-3 meters (6.5-10 feet) above ground. This height is optimal for properly covering the region.
How to connect the PIR sensor with Arduino?
PIR Sensor has 3 pins: VCC or 5V, Gnd, and a digital output pin. This digital pin is used to communicate with the microcontroller.
Connection diagram

As shown in the image, Vcc goes to 5V, Gnd goes to Gnd, and Output is connected to digital input pin 2 of Arduino.
Whenever there is motion detected output pin of the PIR motion sensor goes high.
So based on this result we can read the digital input pin 2 of the Arduino and take the action such as glowing LED.

You can put the Passive infrared sensor in two modes as shown in the above image the jumper is used to connect it in H mode repeatable trigger and L mode non-repeatable trigger.
In retriggering or H mode, the LED stays on while the person is moving in the PIR sensor range. Whereas in non-retriggering or L mode, LED blinks or turns on and off every 1 second when a person is moving in the PIR range.
Also, there are two potentiometers of 1M ohm resistance available for adjusting sensitivity and time delay as shown in the image.
The sensitivity pot is used to adjust the distance from 2-5m and the time delay pot is used to adjust the
time for which the output pin should remain high when the motion is detected.
You can set the range from 5 seconds to 5 minutes. Turn it fully anti-clock so
that you can decide the time delay from Arduino.
Below is the Arduino code to detect motion using the PIR sensor:
Arduino code for PIR Sensor
 int led = 13;    // led is connected to pin 13

int sensor = 2;  // output pin of the sensor is connected to digital pin 2

int val = 0;     // variable to store the sensor status (value)

void setup()

{

    pinMode(led, OUTPUT);   // initialise LED as an output

    pinMode(sensor, INPUT); // initialise sensor as an input

    Serial.begin(9600);     // initialise serial

}

void loop()

{

    val = digitalRead(sensor); // read sensor value

    if (val == HIGH)

    {                            // check if the sensor is HIGH

        digitalWrite(led, HIGH); // turn LED ON

        delay(1000);             // delay 1000 milliseconds

        Serial.println("Motion detected!");

    }

    else

    {

        digitalWrite(led, LOW); // if val is low , led pin set to low

        delay(1000);            // delay for 1000 second

        Serial.println("Motion stopped!");

    }

}
Also, read our blog Types of Proximity Sensor detailing 5 types of proximity sensors and their working principles.
Conclusion
In this blog article, we learnt that the passive infrared sensor is a very adaptable and dependable technology that is ideal for motion detection applications.
Its simple working concept and intuitive interface enable it to detect motion and presence with high accuracy. An effective instrument for seeing intruders, turning on lights, and sounding alarms is a passive infrared sensor.
You can quickly connect a passive infrared sensor, or PIR, to an Arduino and begin detecting motion right away by following the steps in this article.
So why are you hesitating? Get a PIR sensor now to enjoy the advantages of motion detection for yourself!
If you appreciate our work don't forget to share this post and leave your opinion in the comment box.
Please do check out other blog posts about Types of Sensors in IoT , Interfacing Proximity Sensors with Arduino and How DHT11 and DHT22 Sensors Work and interfacing it with a MCU on Proteus
Make sure you check out our wide range of products and collections (we offer some exciting deals!)